It Works Ultimate Body Applicator!

ImageImage

One thing that we as women are always worried about our bodies.  Whether we are overweight, have a muffin top, or a pudge we are well aware of how we look.  So I found an awesome product that will fix this situation.  The It Works Ultimate Body Applicator is great and below are a few things you should know about it. 

What is it?

  • This product is a non-woven c loth wrap that has been infused with a powerful botanically based formula.

What does it do?

  • It delivers maximum tightening, toning, and firming results where applied to the skin.  While many body wraps simply cause water loss the Ultimate Body Applicator uses a botanically base cream formula that, when applied to the skin gives you tightening, toning, and firming results that last.  The botanical ingredients help to deeply hydrate and nourish the skin while reducing the appearance of your body’s contours.  Some of the cutting edge ingredients work to give you visible results in just 45 minutes, while other ingredients continue to work over the next 72 hours, leading to progressive results.


Frequently Asked Questions

What size is the Applicator?

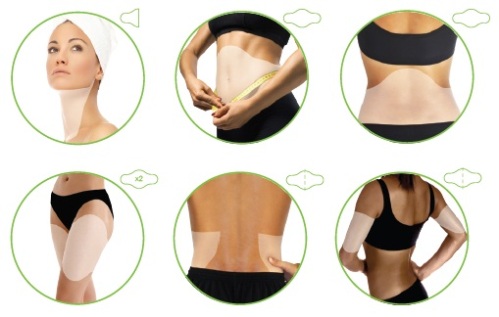
  • Each Ultimate Body Applicator is about 13”x21” and comes in a versatile shape that can be applied wherever you to choose to see results such as the stomach, sides, back, upper arms, thighs or lower legs.Image


How often can I use the ultimate body applicator?

  • It’s recommended that an individual can use the body applicator once every 72 hours.  It is best not to use it less than that.  Each applicator can only be used ONCE and should be tossed in the garbage.

How long should I leave it on?

  • It’s recommended that an individual only uses it only leaves it on for 45 minutes for their first application to test their skin’s sensitivity to the natural ingredients.  For best results use the Defining Gel twice a day in between applicator uses.

                                    (Defining Gel- minimizes cellulite appearance, diminishes appearance of varicose veins, improves skin texture and tightness, softens and hydrates, and it’s made with natural ingredients

`

I know this sounds unbelievable but I’m a witness to my mother’s experience.   It’s just amazing, and while you could leave the applicator on longer than 45 minutes, there is no need to.  The applicator does amazing things in just 45 minutes and continual usage makes a world of difference.  Plus, you don’t have to do the applicator every 72 hours.  You can separate them out a little more (just not less than 72 hours) and still get great results.   And using the defining gel is an awesome bonus.  I love it and my mom is thrilled with her results!


Have more questions?  Then click on this link to check the website of one of the distributors and leave comments below. Enjoy!

http://www.serenitywrap.myitworks.com

Let them eat cake pops!

First cake, then cupcakes, now cake pops! The new delicious cake trend that has emerged within the past few years is fun, light, and tasty! After indulging in my first one I could tell that these bite-sized desserts could get addicting. But then I wondered, how are cake pops are even made? I did a little research and was amazed at how quick and easy thisdessert is to make! Here are quick general steps that can help guide you along the way to making your own personalized cake pops!

Image

1. Bake a cake!

2. With your hands, mash the cake so it makes nice fine crumbs

3. Add frosting in a little bit at a time until the cake can hold a ball shape

4. Roll one-inch balls out of the mixture

5. Dip a cake pop stick into melted chocolate, then into the cake ball

6. Freeze for 20 minutes

7. Dip cake pops into melted chocolate so that it is completely covered

8. Decorate!

The great thing about cake pops is that they are perfect for every occasion. Have a family party to go to and don’t know what dessert to bring? Bring cake pops!  From baby showers to soccer games to wedding receptions, cake pops can go from colorful and fun to classy and elegant.  Have you guys ever-made cake pops? I want to see your deigns! Post images of your creations below!

-Autumn

ImageImageImageImage

Mother’s Day Gift Guide

Between school coming to an end, busy schedules, and all the other little things, Mother’s Day is approaching quicker than we know (May 12th!!). In order to get that perfect gift let’s make some time and get a head start.  Below are a list of some of my favorite picks to remind mom just how special she really is.

1. Marc by Marc Jacobs Love Edge Stud Earrings $42 Image


2. Mr. Boddington’s Mistral Soap $8.00

Image


3. Printed Linen Scarf $55Image


4. Parisianne Cake and Dessert Stands $31 (set of three)Image


5. Scalloped Edge Glass Candle by Voluspa $30Image

6. Kate Spade Margherita Floral iPhone 5 Case $40

Image

7. “Love you to the moon and back” Pillow $24

Image


8. Christian Lacroix Surrealist Journal $25Image


9. Eiffel Tower Bookends $58Image


10. Round Recycled Glass Birdfeeder $39.95Image


I hope this is makes the process just a bit easier for you and puts a smile on Mom’s face. Enjoy Mother’s Day and don’t forget to let your mom know how much she means to you!  Please leave a comment below letting me know of any great gift ideas you have!

Xoxo,

Alli

EnRgy

Normal
0

false
false
false

EN-US
X-NONE
X-NONE

/* Style Definitions */
table.MsoNormalTable
{mso-style-name:”Table Normal”;
mso-tstyle-rowband-size:0;
mso-tstyle-colband-size:0;
mso-style-noshow:yes;
mso-style-priority:99;
mso-style-parent:””;
mso-padding-alt:0in 5.4pt 0in 5.4pt;
mso-para-margin-top:0in;
mso-para-margin-right:0in;
mso-para-margin-bottom:10.0pt;
mso-para-margin-left:0in;
line-height:115%;
mso-pagination:widow-orphan;
font-size:11.0pt;
font-family:”Calibri”,”sans-serif”;
mso-ascii-font-family:Calibri;
mso-ascii-theme-font:minor-latin;
mso-hansi-font-family:Calibri;
mso-hansi-theme-font:minor-latin;}

One thing that most people are lacking is sleep.  Being so busy with work and other personal activities a person would need something to help with their energy and still be a healthy option.  I’m very familiar with Herballife and I love their products!  They have so much to offer but our focus right now is on energy.   There are a few products I like to use and they include the following:


·        Image Herbal Tea Concentrate: This tea is a blend of herbs that contains antioxidants and supports and boosts energy and metabolism.  It can be taken hot or cold but either it’s delicious.  You should have something to eat before you drink it whether it’s yogurt or a full breakfast.  Just get a cup with eight ounces of hot or cold water no more than a teaspoon of the tea powder and a scoop of sugar (more or less if desired).  Do this and your body will be ready to go.


·         ImageLift Off: This tablet increases energy and improves mental clarity.  Just get eight ounces of water and drop the tablet in. Let it completely dissolve and you’re good to go.


·         ImageH3O:  This powder mix provides electrolytes and supports cellular re-hydration.  It has energizing carbs to sustain energy levels along with antioxidants that neutralize free radicals that cause fatigue and soreness.  Pour this into eight ounces of water and you’re ready to go.


My personal favorite is a mixture of all three.  It tastes great and I’m pumped for the day without the crash at the end.  Just use 12-16 ounces of water, a teaspoon of herbal tea concentrate, one lift off tablet, and one packet of H3O and you’re ready for the day!  So comment below and tell me what worked for you!  If you have your own product that you use then let’s hear it! Enjoy!


Top 5 Hairstyles for a Rainy Day!

It’s the month of April again and you know what that means. Rain Rain Rain and more Rain. Just when you think the weather is about to be warm and sunny you get stuck with something worse; humidity. Sure we can spend time every morning complaining about the weather and global warming, or instead we can focus that energy on effortless hairstyles that can stand up to the rain.

Below are the top five celebrity inspired hairstyles that can withstand rainy days. These hairstyles can be very simple, quick, and easy for those who like to run out the door in the morning, or they can be taken to a whole new level to create more detailed looks. TIP: Braids with any of these hairstyles will help your hair survive the humidity.

Through hoods, umbrellas, and gusty winds, these top five hairstyles will be sure to keep you looking and feeling great. Although the weather may be gloomy, don’t let your hair suffer!

1. Side Braid

ImageImage

2. Top Knot

ImageImage

3. Ponytail 

ImageImage

4. Headband 

Image

Image

5. Low Bun

ImageImage

Now I want to know more about you guys! Which of these works best for you? What are some of your own go-to rainy day hairstyles?

 -Autumn

The Mighty Coconut Oil!

Being someone that advocates a healthy lifestyle, when I heard all the buzz about the health benefits of coconut oil I was intrigued. Before going out to buy my hefty jar of this oil, I did my research on all of its extensive health benefits. 

I was shocked! Coconut oil is absolutely amazing for you, and the best part is how versatile it is. You can cook with it or add it in to your beauty routine. Lets just say that after buying my first jar, I used it so much I had to buy another one in just a few weeks. 

Now I won’t get in to all the scientific details of why Coconut oil is so good for you, because it really is quite extensive and there are lot of big scary words that can be tad confusing. 

However, I will tell you for what coconut oil is good for and how you should use it based upon my personal experience! 

Here are some of its awesome benefits: 

Image

Now for the how! Here is my suggestions on how you should use coconut oil, based upon how I use it!

1. Cook with it! 

Since coconut oil consists of fatty acids that are good for our body, it makes an excellent tool to cook with. The flavor of the coconut is in no way overpowering and will not alter the taste of your food. It makes a healthy alternative to cook with, and can also be added to your smoothies in the morning a boost of energy and to promote healthy weight loss!

2. As a hair treatment 

Feeling a little dry and damaged from this long and rough winter? Then you MUST try coconut oil masque in your hair. Simply spread the oil all through you hair and leave in for 15-30 minutes. Wash out thoroughly and get ready to have some luscious and shiny locks. Not only will coconut oil hydrate your hair, but the nutrients in the oil will promote hair growth! 

3. As a moisturizer

I’m sure that the idea of putting an oil on your face is not very attractive, but if you suffer from dry or dehydrated skin this is the solution for you. For my personally it not only nourished my skin but it  corrected uneven skin tone and hyper pigmentation from acne scarring. If you suffer from rosacea or eczema coconut oil ill nourish your skin and treat the problem.  


In addition you can use coconut oil to promote healthy weight loss, treat infections, aid with digestion, build up your immune system AND MANY MORE!

If you want to read more extensively on the benefits of coconut oil click here!

This stuff is a miracle worker, and I will definitely continue to use it in my every day routine! 

You can purchase online on amazon, or stop by your local Trader Joes! 

Now it’s your turn! I want to hear if you guys have any other ways for using coconut oil, or stories on health improvements since you have been using it!

Until next time! 

xoxo,

Erika 🙂 

Bring The Outdoors In!

Lately I have been noticing more and more fun, colorful, and decorative terrariums everywhere I go.  Whether it is while Im shopping at a cool clothing store or relaxing at a coffee shop, it’s in my eye sight.  The more I see these, the more I wanted to create my own.  With just a few simple steps I realized just how easy this was to make!

What You Will Need:

  • A glass container or other clear vessel with a large enough opening to place plants inside
  • Small stones for drainage (gravel, pebbles, or river rocks work well)
  • Sand (different varieties optional)
  • Soil
  • Plants (should have the same environmental needs)
  • Fun landscaping accessories
  • A funnel and chopsticks (tools to move objects around in the container)

Steps:

  • Clean container to prevent bacteria
  • Place drainage at the bottom on the container
  • Incorporate different sands for a layered look
  • Add soil (make sure to leave holes for plant roots to fit in)
  • Place your plants into the soil and lightly pack the soil around them
  • Add your landscaping accessories and have fun decorating!

Maintenance: 

  • Water 1-2 times per week (avoid watering any moss, dried flowers, etc.)
  • Lightly mist the terrarium daily
  • Clean any dead foliage or over grown plants to avoid rotting
  • Terrariums do best in natural, indirect light so avoid placing it in direct sunlight or any other hot areas

Image

Image

Image

Image

I hope that this inspirers and helps you to create your own little piece of nature!!  Be creative, have fun, and let me know if you have any other questions on the process!

Xoxo,

Alli

How to order at Starbucks: 8 Simple Steps

Ordering a Starbucks drink can be confusing and nerve racking. After working at Starbucks for a while, it amazes me how many people come in all the time and are still saying their drink wrong. No one blames you! Trying to remember a jumble of words with no structure can cause anyone to forget things or get frustrated! This is why Starbucks created a few simple steps to customize your drink so that it gets across correctly to the barista. With the system printed on the side of Starbucks cups, ordering can become easier, less confusing, and faster.


Many people order plain drinks because they are afraid and fairly do not know how they can customize it. Instead of getting your regular boring coffee or latte try something new and customize your drink!

Image


  1. Hot or Iced – If you want it hot (or frappuccino) skip this step. If you want it iced say “iced”
  2. Decaf – If you want no caffeine say “Decaf” If you want half the amount of caffeine say “Half-Caf” If you just want it regular skip this step!
  3. Shots – You can add as many shots as you want to your drink
    1. 1 –single (solo)
    2. -double (doppio)
    3. 3- triple (trippio)
    4. 4- quad

4. Size

               Short- 8oz. (only available for hot drinks)
               Tall-12oz
               Grande-16 oz.
               Venti-20oz for hot drinks and 24oz. for iced drinks
               Trenta-30oz. (only available for iced teas and coffee)
 
5. Syrup – This is where you say what kind of syrup you would like (if it doesn’t already come in the drink) and how many pumps. SF means that is comes in sugar free as well. Here is what we have:

                                               i.     Hazelnut (SF)

                                             ii.     Vanilla (SF)

                                            iii.     Caramel (SF)

                                            iv.     Cinnamon Dolce (SF)

                                             v.     Peppermint (SF)

                                            vi.     Classic

                                          vii.     Raspberry

                                         viii.     Vanilla Spice

 6.   Milk-

    -2%    -Non-fat      -Whole        -Half and Half       Soy


7.    Custom- This is where you can get creative! Some examples are no whip, light foam, extra hot, with two Splenda, with room, light ice

8.     Drink -Tell us what you want!

-Coffee

-Latte

-Cappuccino

– Americano

Mocha/white mocha

-Frappuccino

Espresso

-Misto

-Hazelnut or Caramel Macchiato


Non-coffee Beverages

-Tea

-Hot Chocolate

-Caramel Apple Spice

– Steamer

-Chai Tea Latte


Other Lingo

Skinny – Using non-fat milk and sugar-free syrup

Brevé –same as saying Half and Half

Espresso Con Panna – shots with whip cream on top

Espresso Macchiato – shots with foam on top

Half Caf – half decaf and half regular

Dirty – adding a shot to a non coffee drink

Red-eye – one shot of espresso added to a coffee

Black-Eye – two shots of espresso added to a coffee

Dry – extra Foam

Wet – less Foam

Ristretto – shorter and sweeter shot of espresso

Affogato – shots are poured on top of drink

Kids temp – steamed at 130 degrees, less hot!


Now lets try it!

-Iced triple grande two pump skinny vanilla latte


-Venti decaf brevé extra hot no whip mocha


So there you have it Starbucks lingo decoded! Any other questions comment below! Let me know how you like to customize your Starbucks beverages!


-Autumn

Coachella Fashion!

So this is the perfect follow up to my last post on summer music festivals! While I am an advocate of comfort during these sort of events, I am also not a top celebrity that gets to hang out in cool tents all weekend, and has the luxury of being backstage during shows. 

I really enjoyed getting to see all the fashion from the festival, as well as all of the different personalities expressed though the clothing of all the fashionistas! 

Here are some of my favorite looks from Coachella 2013: Weekend #1! 

1. Alessandra Ambrosio- Hippie Chic

Image

2. Ana Beatriz- Boho

 Image

3. Katy Parry- Queen of prints

Image

4. Alexa Chung- Proper Lady

Image

I loved the variety of looks throughout the whole first weekend of Coachella, and I can’t wait until next weekend for round two of fashion spotting!

Did you guys have any other favorite looks? Would you recreate any of these for your upcoming festival? I would love to hear your feedback! 

I’m thinking I’m still going to sporting my running shoes and some comfy shorts for Lollapalooza this summer! 😉 Ahhhh, the life of being a VIP! 

Until next time! 

xoxo, 

Erika 

Blog Inspiration: Man Repeller

Of course, we all love the blog 4fashgirls, but what if you want to add a little spice to your blogging adventures?!  One of my all time favorite blogs is called Man Repeller.  I know, you’re probably thinking, what a weird name for a fashion blog.  That is exactly what I thought until I did a little research.  This blog has a hilarious definition of what a ‘man repeller’ is. ImageAs you can see, man repeller is a fun and quirky blog, but it also has a lot of great fashion information, tips, and style inspiration written in an easy to read short segment.  The writer and creator of the blog was a journalism major, which is why her writing is so entertaining. She also has amazing style!!  The more you read, the more you will fall in love with her.  She is adorable, funny, outgoing, and much more!  The website is colorful, eye catching, and has an easy to navigate, which are obvious factors in a good site.  There are many different sections to browse and I swear, you’ll get hooked for hours!!

Check out the blog at:  http://www.manrepeller.com/

Leave a comment below with your favorite blog!! 

Xoxo,

Alli